


CentOS 6 to CentOS 7 cPanel Migration Guide
In 2020, cPanel will no longer support running its software in a CentOS 6 environment. Seeing that we have a few servers running CentOS 6, we had to put together a game plan to migrate our clients’ servers to CentOS 7 in the most efficient way possible. The solution was to provision a brand new server with a temporary IP, copy all the server data over, then replace the IP’s on the new server to match what they were on the older server. This promised maximum synchronization with minimum downtime for our clients’ servers.
Since this is easier said than done, we have put together a detailed step-by-step guide below for you to follow to ensure your clients are well taken care of during your migration from CentOS 6 to CentOS 7:
Step 1
A Fresh Start
Deploy a fresh installation of Centos 7 with a temporary hostname and IP. Then install cPanel.
It is extremely important that you match all the WHM settings from our old server to our new server including Exim settings, tweak Settings, PHP settings, etc. To simplify the process, we elected to use the same root password that was set on the old server.
TIP: In basic WHM settings, enter the nameservers from your old server. However, make sure to use the actual IP from your temporary server, otherwise, SSL settings will not be copied over correctly.
Step 2
The Migration
Using Jetbackup’s clone job, migrate the cPanel accounts with full settings from the old server to the new server. In order to do this, first login to JetBackup on the old server and create a clone destination.
Under the Destinations section, click “Create New Destination” :

“Destination Type” should be set to “SSH cPanel Clone”.
“Destination Name” should be a recognizable name of your choice.
“Remote Host” will be the new server’s root IP address.
“Port” will be the SSH port that is set on the new server.
“Authentication Type” can simply be password authentication.
Now that you have an SSH cPanel Clone destination set up, go into the “Clone Jobs” section and click “Create New Clone Job”

“Job Name” should be a recognizable name of your choice.
“Destination” will be the “SSH cPanel Clone” destination you just previously set up.
“Account IP” should be set to “restore with shared IP”.
TIP: This will use your temporary server IP listed in “Basic WHM settings” (you need it for SSL to work). If you use the old server IP before it is assigned to the new server, SSL certificates will not install during the transfer.
“Schedules” you do not need to create a schedule as this job can be run manually.
Next we were ready to sync our accounts, so we ran the newly created clone job. The first time running the clone job will take a while to complete as it has to move over all the data. All future runs of the clone job should be extremely fast since it is incremental and only migrates new or updated files to the destination server.
When running our first clone job on a client’s server, we became worried when almost 24 hours had past and the clone job still was not finished. We decided to stop the job and start investigating what could have gone wrong. It turns out that a handful of the cPanel accounts had 10’s of gigabytes worth of error logs and trash files that significantly slowed the process down. Once clearing out this data, we started the clone job again. To our surprise, it picked up right where it left off and finished the remainder of the account migrations quite quickly.
Once your first manual clone job has completed, you will want to create a schedule to run every day and sync the accounts in the background. This job should only take a couple of hours to run each day.
The accounts should be copied exactly as they were on the old server including all their settings, subdomains, mysql databases, email accounts. If both servers are running Cloudlinux, the PHP settings will also be copied in their entirety.
TIP: Please note that whitelisted ModSecurity rules and accounts with dedicated IP addresses will still need to be adjusted on the new destination server.
Once you have selected the day to do the final migration, be sure to notify your clients regarding the small maintenance window that will occur.
Step 3
The Switch
On the day of your migration, to minimize issues, schedule the final clone job run in the early morning hours and then block client access to cPanel via the server firewall. Also block access to Joomla, WordPress, and other CMS software via a set of custom ModSecurity rules.
Next, copy the Jetbackup settings using jetcli export-import commands:
https://docs.jetapps.com/jetbackup/jetcli-import-export-settings
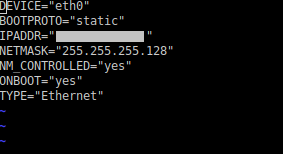
On the new server, edit the main network interface to switch the main IP address from that of the temporary server to the old server IP. Also, be sure to add the file which included the IP range of the other addresses active on the server.
The interfaces reside in /etc/sysconfig/network-scripts and are usually called something like: ifcfg-eth0 or ifcfg-eno23212
Once everything is in place, bring down the old server. In case something goes wrong, instead of powering down the server immediately, connect via LAN from another server on the same network to bring down the network interface: ifdown eth0.
Now your server is down and the clock is ticking! Since everything was prepared in advance, you simply need to run the following command on the new server: service network restart. The new server network should immediately restart with IP addresses you replaced from the old server. After the network comes back up, reconnect and switch the hostname from our temporary hostname to the old server hostname using the following cPanel script: /usr/local/cpanel/bin/set_hostname .
Step 4
The Finishing Touches
Next step is to login to your new WHM to finish adjusting your settings. Under basic cPanel/WHM settings change the main shared IP to that of the old server.

Next, switch the IP addresses on all your accounts. The fastest way to do this is to use the WHM IP migration wizard.

Under the IP migration wizard, we entered the IP to switch to. At that point, it is just a matter of going through the screens and the wizard will do the rest of the switching of your IP addresses.
If you have accounts set up on dedicated IP’s, be sure to manually change them using the “Change Site’s IP Address” interface.
Following these steps above should provide you with a success server migration. The best part is your downtime should be 7 minutes or less!!!
When you are done patting yourself on the back, remember to import the Jetbackup settings, reconnect to the backup destination and remove the clone job which will no longer be needed.


